
Apache web server[1], also known as Apache HTTP server, is one of the most popular web servers for UNIX and Windows[2] operating systems. In this tutorial, I’ll show you how to install and configure Apache web server on Ubuntu Linux 22.04.
Table of Contents
Apache web server allows you to serve web pages and deploy web applications. It can also be used as a reverse proxy server. Apache web server is easy to work with, and it has many similarities with Nginx web server[3].
How to install Apache on Ubuntu Linux 22.04
The latest version of the Apache HTTP Server is 2.4.54. The new-generation branch[4] tends to use less memory than the 2.2.x branch, and it also allows users to define variables in Apache configuration files.
Here are the prerequisites for installing Apache on an Ubuntu 22.04 machine:
- A minimum of 4GB RAM and at least 5GB of storage.
- Java version 8 or newer. To verify if Java is installed, you can use the java –version command on your device.
- The installation of Apache web server can be done using non-root user with sudo privileges.
Updating the system repository
Before performing any software installation on Ubuntu, the first action you need to perform is to update the system repository to ensure that the OS has all of the latest packages available for installation.
- Log in to your Ubuntu machine using your SSH client.
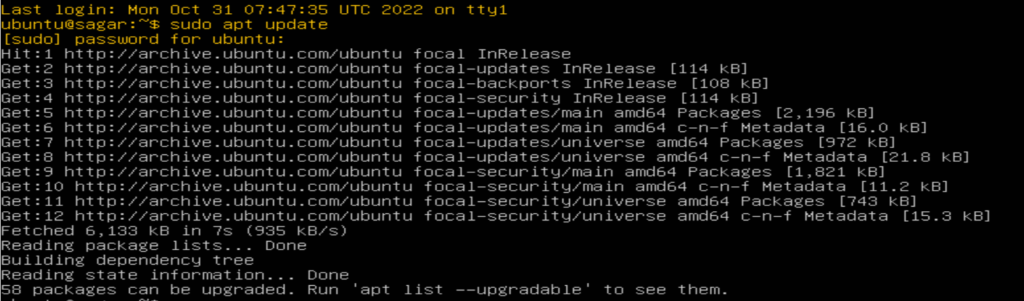
- Next, run the sudo apt update[5] command to update the APT package index to the latest version (sudo is used to elevate permissions for a non-privileged account).
sudo apt update
Installing Apache web server
Installing Apache web server on Ubuntu is a straightforward process that requires a few commands to be executed, followed by a system boot. The command below will fetch the Apache web server software from the APT repository stored locally on Ubuntu.
sudo apt install apache2

We’ll need to use a couple more commands to enable the Apache software on Ubuntu. The start command will start the Apache service, but the service will stop as soon as your machine is shut down. That’s why it’s recommended to run the enable command as well.
sudo systemctl start apache2
sudo systemctl enable apache2

Testing your Apache web server installation
To check if the installation of Apache web server was successful, you can run the command below:
service apache2 status
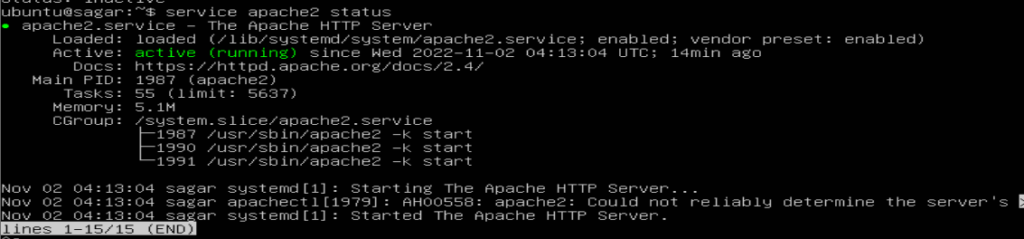
Alternatively, you can also use the command sudo systemctl status apache2 to test your Apache web server installation.
How to manage the Apache process
Once Apache is successfully installed, you can use the command below to check if the Apache process is running as expected. It will also provide you with other details such as the directory from which the Apache service started.
ps aux | grep apache
It is also important to understand through which user the Apache process was triggered. For every process invoked, a PID[6] (Process Identifier) is generated. In the image snapshot below, we can see that the Apache process started using the root user, and it has the PID 6524. However, the www-data directory was created with a different PID (752660) since it’s a separate process.

Configuring your Firewall
We need to check our firewall settings to make sure that the Apache software we’re installing on a web server will be accessible on a public IP address. To do that, the UFW (Uncomplicated Firewall[7]) program on Ubuntu lets us manage firewalls on Linux.
Here, the UFW added the Apache settings as a profile. There are three profiles that are registered with our Apache installation, and they can be detailed by using the following command:
sudo ufw app list

- Apache: This profile only opens port 80, and traffic that will route to the Apache web server will be unencrypted.
- Apache Full: The Apache full profile opens port 80 where traffic is unencrypted, as well as port 443 where traffic is encrypted using a TLS/SSL certificate.
- Apache Secure: This profile opens only port 443 (TLS/SSL encrypted traffic).
In this tutorial, we won’t be using a TLS/SSL certificate and we’ll be enabling the Apache profile with the command below.
sudo ufw allow 'Apache'

After enabling the Apache profile on Ubuntu, you need to check that status of your firewall is active with the command below:
sudo ufw status

Setting up virtual hosts
In this section, I’ll show you how to configure Apache with a virtual host, which will allow us to host multiple domain names on our server and add different configurations.
Creating the directory for your domain
First, you need to create a directory for your domain. The command below will create a directory named your_domain under the /var/www directory.
sudo mkdir /var/www/your_domain
Creating a sample index page
Next, you can create a sample index.html page using nano or another editor:
sudo nano /var/www/your_domain/index.html
Now, add the following code in the index.html file:
        Welcome to the Apache page !


        Success!  This is one of the main Apache doc !
Creating a virtual host configuration file
In order for Apache to serve this content, it’s necessary to edit a virtual host file with the correct directives. Apache comes with a default virtual host file in the /etc/apache2/sites-available/ directory.
Let’s edit the default virtual host file using the vi command, then we’ll copy/paste the code below and save it.
sudo vi /etc/apache2/sites-available/000-default.conf


    ServerAdmin webmaster@localhost
    ServerName your_domain
    ServerAlias www.your_domain
    DocumentRoot  var/www/html
    ErrorLog ${APACHE_LOG_DIR}/error.log
    CustomLog ${APACHE_LOG_DIR}/access.log combined
On Ubuntu, the Apache web server serves documents stored in the var/www/html directory by default. This directory is referred to as the DocumentRoot. You can notice here that we’ve updated the DocumentRoot with our new /var/www directory.
The ServerAdmin line in our code is optional and only used for documentation. Here, we’ve updated it to add an email that the your_domain site administrator can access.
Testing your virtual host configuration
After setting up our website, we need to activate the virtual host configuration file to enable it. We do that by running the following command in the configuration file directory:
sudo a2ensite 000-default.conf

You should see the following output: “Enabling site 000-default.conf”
To activate and load the new site, we need to reload and restart Apache by running the following Linux commands:
service apache2 reload
sudo systemctl restart apache2

Now, test your Apache configuration again by running the curl command on localhost followed by port 80 for HTTP traffic.
curl localhost :80

If we see the default Apache landing page, it confirms that Apache is successfully installed with the latest virtual host configuration.
Conclusion
In this tutorial, we’ve covered how to install Apache Web Server on Ubuntu version 22.04. We’ve also explained how to configure Apache configuration files and directories, which are most important for any Apache admins and developers. If you wish to deploy web pages and web applications easily, Apache is pretty much your go-to software.
References
- ^ Apache web server (httpd.apache.org)
- ^ Windows (petri.com)
- ^ Nginx web server (nginx.org)
- ^ new-generation branch (downloads.apache.org)
- ^ sudo apt update (www.cyberciti.biz)
- ^ PID (en.wikipedia.org)
- ^ Uncomplicated Firewall (en.wikipedia.org)